Wednesday, December 8, 2010

Merry KissMas Tree!


NightOwlCrafting


It's time for this week's Hoo's Got Talent on Night Owl Crafting! This week I'm showing you the gift that I make for my husband and his co-workers almost every year...a KissMas Tree! It's a super easy craft that is a big hit with his friends at work. This year I used dark chocolate kisses, but you can use whatever kind you want. 

For this craft, you'll need one craft cone (you know, the floral kind), two bags of Hershey's kisses, a box of toothpicks and some scissors that are capable of cutting the toothipicks (so don't use your good fabric scissors!) One other thing you might want to use although it's optional, is a lid from some sort of spray can, like spray starch. This will be used as a base for the tree and makes sure it sits straight once the kisses are all in place.


Some of the supplies you'll need. Not pictured: Floral foam cone

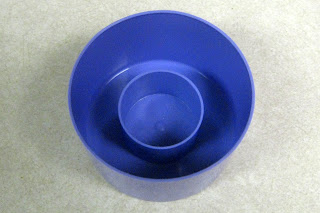
Optional plastic cap, this one from a can of spray starch!
To start, you'll want to cut a bunch of toothpicks in half so you have at least 40-50 halves. You'll probably need more (I didn't count!) but that will get you started... Once you've cut the toothpicks in half, insert each half, pointed end first, into the bottom (flat part) of the kiss. If you want to do an all green tree with only a few colored kisses as ornaments, you'll probably need more than two bags of kisses...that's why I decided to go the "striped" route with this tree...less green ones needed!


Cut toothpicks in half and insert pointed end into bottom of kiss
After you've gotten quite a few kisses prepared, you're ready to start putting them into the tree. Choose what color you want your topper to be and stick your first kiss in the top of the tree. Then, working concentrically, wind your way down the cone, adding kisses as you go. Once all the kisses are in the tree, you can put the can lid into the base if using and you're ready to go! To give as a gift, just take some cellophane and wrap it from bottom to top, tying at the top with a pretty bow.  Make sure you warn anyone who wants to rob your tree that there are toothpicks in the kisses! Occasionally the end will break off in the kiss so they'll want to keep from biting into a hunk of wood!

Without the cap base

With cap base

Merry KissMas!

Wednesday, November 24, 2010

Hoo's Got Talent: Salt Dough Cornucopia


NightOwlCrafting


This year I decided to try making a cornucopia for use as a centerpiece for Thanksgiving. I've seen them done with bread dough before but wanted something a little more "lasting" (i.e. can be reused year after year) so decided to try it with salt dough instead. Here's my recipe for salt dough which I used for this experiment...

Salt dough for crafting

2 cups water
2 cups salt
6 cups flour (I used "white wheat" because it was stale in the pantry and needed to be pitched...)
2 tbsp vegetable oil
1 egg

In the bowl of a large stand mixer (i.e. Kitchenaid) mix flour and salt together. Add oil and then slowly add water. Start this process with a regular mixing blade but switch to a dough hook when it starts taxing the mixer. Allow to mix until combined then remove to the counter where you need to knead it for another 5-10 minutes or until pliable. It is now ready to use for all kinds of crafting projects...

For the cornucopia project, you'll need a disposable pizza pan (3 to a pack at W-Mart), a cookie sheet, some spray oil (Pam) and a spray bottle with water in it. Form the pizza pan into a cone shape and slightly bend the narrow end to form a slight arc then spray liberally with Pam. Also spray your cookie sheet with Pam. Now, roll out your dough into 1/4" thickness or so, then slice into 1.5" thick strips. Starting at the narrow end, wrap the dough strips around the cone, spritzing with water as you go to act as "glue". Make sure you overlap your strips by 1/2" or so as you wrap and just start a new strip each time you end one, making sure to adhere the new strip well. Once you've wrapped to the end of the cone (or as big as you'd like your cornucopia to be), spritz the whole thing with water and lightly press together to make sure it's all well stuck. Now, take a ball of your dough and divide into three lumps. Roll each into a long snake piece, at least as long as your cornucopia opening is around, then braid the three pieces together. Flatten the braid slightly. Now spray the opening of your cornucopia with water and adhere the braid to the opening edge. Place your completed cornucopia on the cookie sheet and place in a 350F. oven for 30 min. Meanwhile, whisk your egg with about 1 tbsp water to make an egg wash. After 30 minutes are up, brush your cornucopia well with the egg wash and allow to bake another 15 minutes. Brush again and allow to go 15 minutes more. Now, turn the oven as low as it will go (170F for my oven). Carefully remove the pizza pan from your cornucopia opening and allow to continue baking at the lower temperature for 2-3 hours or until completely hard and dried out. At this point let your creation cool and use or you can spray it with spray varnish to preserve for future use.


This dough can also be used for making ornaments, faux fruit, pumpkins, etc. for your decor, etc. It can be painted once baked with tempera paints as well.  I'll share the finished product tomorrow after we add the "dressing" for the centerpiece...


Thursday, November 18, 2010

Holiday Hats

I decided to join the "Hoo's Got Talent" round-up over at Night Owl Crafting this week and thought I'd share some of my recent projects...


NightOwlCrafting


I've been keeping myself occupied recently with my new 3 month old and her 2 year old sister, but in my spare time (HA!) I've been loom knitting some cute hats for her and her older sister... Thought I'd share them with you and pass along the links to my sweet friend Brenda's blog where she shared the patterns with us in our loom class...

Here's the first one is a "pumpkin" head hat made following Brenda's pattern that you can find here.


As modeled by 2 year old Emma

And a smaller version modeled by then-2 month old Hannah
 The second hat is a Turkey Hat, again from Brenda's blog


Emma LOVES hats :)
The last one I did is a snowman hat following the directions Brenda posted here, but I'll have to share photos of that one later since I've not gotten them taken yet! Hope you enjoy these few and will check out Brenda's patterns on her blog! Be sure and check back with me next week for a new "Hoo's Got Talent" post!

Wednesday, June 10, 2009

F page completed

Ok, I've completed the F page for my art journal and while I'm not completely happy with it, I guess it turned out "ok". I was out of town (in Corpus for our church annual conference) last week and so am trying to catch up before we head out of town again to go to Ohio next week. I'm going to try and get my S page done tomorrow :)

Process description:
Fawn colored background - watercolored floral scraps from flower catalog - center is a "wordle" collage of various F words as shown below
Wordle: F words
- letter F negative stenciled with ivory paint - Entire surface stippled with walnut ink - dry brushed over all with forest green and french rose paint colors mixed with glaze medium - F stencil outlined with black sharpie then entire surface sanded for distressed finish.

Here's the finished results. Click the thumbnail for a closer shot. Enjoy!
F page after

Monday, June 1, 2009

N pages complete

Well, I've completed my first layout for the ADW (see next post) and thought I'd share it as well as my process. Started with two page spread which was gesso-ed white. Right side had window cut into it which I turned into a door opening. Painted light blue craft paint over entire area and let dry. Mixed medium blue paint with glaze medium (half & half) and then spread over light blue. Wiped most of this off leaving a heavier concentration around the outer edges and let dry. Then mixed dark blue paint with glaze medium (1/3 paint, 2/3 glaze) and again wiped off most. Took gold Brilliance ink and stamped random stars over background. Using a waded up paper towel, "swiped" some gold on as comet trails then rubbed a bit around the window opening on right page. Next, stamped the word "NIGHT" in white Brilliance ink followed by random fonts of the letter N all over background. Again "swiped" a bit of white ink as comet trails. Used white paint on fingertip to create white "background" for wording of poem, Lord Byron's #600 (She walks in beauty...). Using a black sharpie, lettered the poem, then inked around window opening and "stitched" around "NIGHT" stamping. Finally, I created a gel medium transfer of a vintage woman. I cut out a "door" of cardboard which will be adhered to reverse of right page and painted it with gold craft paint, then adhered the transfer to this "door". Enjoy!

New Adventure - Alphabet Discovery Art Journal

alphabet discovery workshop logo

Ok, so I'm trying to break out of my creativity rut and have enrolled myself in Trish Bee's Alphabet Discovery Workshop. Our goal is to create an art journal using the alphabet as inspiration. First letter chosen was the letter N. I wanted to capture "before" photos of my book so you could see the results as I post them and compare. So below are photos of the "Before" pages, gesso-ed and ready to go. I decided to use a book I purchased for altering quite some time ago called "The Doll House Book". Bought it damaged from the used book store for another project and never "got around to it" so am using it here. The book is "house" shaped and the front opens like two barn doors. It should make an interesting altered book. Anyway, here are the photos of the before work (click on them to be taken to the photos with descriptions):

Monday, July 28, 2008

Friday Fill-ins


1. I believe whatever doesn't kill you mustn't be all that bad!.

2. If you're good at something, improve.

3. Why so many rude cell phone users?.

4. Something is out there, it's just a matter of finding it.

5. If my life were a sitcom, it would be titled Waiting for What?.

6. Sitting on my back porch [if you don't have one, use your imagination] I see sunflowers growing over my Astroturf lawn.

7. And as for the weekend, tonight I’m looking forward to getting more unpacking done, tomorrow my plans include knitting and watching hubby paint and Sunday, I want to sleep!